Regular Expression Parser and Compiler

I have been given an assignment focused on regular expressions (regexp) and parsing. This assignment is split into two parts. A parser and compiler that converts a regular expression into a set of Finite State Machines (FSM) that can then be loaded into a second piece of software that searches a piece of text for patterns that match the regular expression. I will work on the first part and my partner will work on the second.

The parser and compiler will adhere to a set of rules that have been laid out for us in the assignment document. An expression will then be run through that set of rules and the program will output a set of FSM that the second piece can then read. This will require format to be agreed with my partner but I feel this should be relatively simple. The rules for this compiler are as follows:

Rules

  • Any non-special character is a literal
  • . (period) is a wild card that can be any literal
  • adjacent regexps are concatenated to a single regexp
  • * indicates closure (zero or more) on the preceding regexp
  • ? indicates that the preceding regexp can occur zero or one times
  • | is an infix alternation operator such that if r and e are regexps r|e means r or e
  • ( and ) may enclose a regexp to raise its precedence such that (e) is a regexp that is equivilent to e
  • \ is an escape character that matches λ but indicates that the following character loses any special meaning and is a literal
  • Operator precedence is as follows:
    • Escaped characters
    • Paretheses
    • Repetition
    • Concatenation
    • Alternation
  • Optional: ! not operator

An example of this would be (r | e) a*:

State0123456
Typebrbrrebraλ
Next 1124454.
Next 213..6..
FMS Table of Regular Expression Above
Regular Expression FSM graph

I will continue to work on this over the next few weeks and provide updates as I go along with the development process.

Quantum Key Encryption Simulation in Java

Introduction

The goal of this assignment was to simulate symmetric Quantum Key Encryption. We did this by creating a Qubit class and using that to generate the key that is to be used in the XOR class we create. This will allow us to pass messages without exposing their content to the outside world. I decided to do this in Java as it is what I have the most experience in.

Qubit Class

This part of the assignment was quite simple as we were given a UML diagram for the class and were able to simply create the class based on that. It is a simple object that allows for the storage of a value and a polarisation. There is also a measure method that returns the value if the polarisation matches else it generates a new random polarisation and then returns the value.

XOR Class

This was just a simple matter of applying an XOR operation to the message using the key repeated to the end of the message.

The Encryption Algorithm

I decided to break this down into three parts. A transmitter class, a receiver class, and the main method. The transmitter creates a random stream of bytes. Then the receiver takes that stream of qubits and using random polarisation generates its stream of qubits using the values from the transmitter’s random polarisation.  Then the transmitter passes back the new qubits and each generates its key. Both keys should match. Then the main method performs the XOR encryption and decryption.

Testing

I wrote a few simple unit tests throughout the creation of this project using jUnit. These helped me to ensure all parts of the software were working as I intended and allowed me to better identify issues and bugs I found while creating software.

Encryption Unit Testing
JUnit test

Conclusion

This project was quite fun and it was interesting to learn about some of the lesser-known parts of computer science such as Quantum Computing and Encyrption. I learned a lot and look forward to studying some parts of this a bit further.

Creating a RESTful API

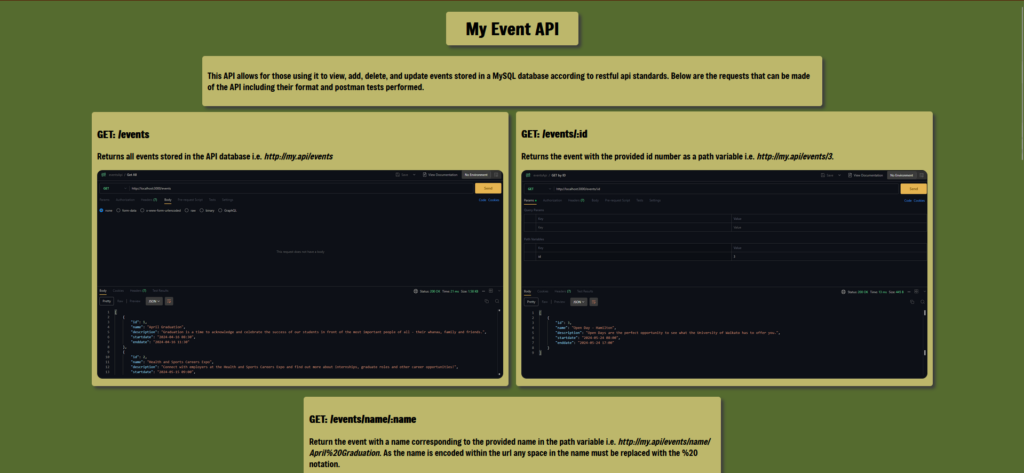
For a class on advanced web development, I was tasked with creating a RESTful API for events using NODE.js and Express. All the data is stored in a MySQL database and was formatted using ‘id, name, description, start date, end date’. I also created a homepage that includes the documentation for said API.

RESTful API documentation.
Homepage created for API.

I used a tool in VS Code called ‘Postman’ which allows for simple testing of APIs by allowing quick creation and viewing of HTTP requests and their responses. As this project is just a proof of concept and not meant for hosting on the web it lacks any sort of validation but allows any user to view, create, update, or delete any event in the database.

The back end is routed using Express which allows for the triggering of functions based on the URL and method of the request i.e. http://localhost:3000/events would call a function in the server that selects all events in the database.

RESTful routing code
Calls the getAll function.

This project was an interesting one and presented new challenges, I have yet to do much web development that did not involve making websites so the opportunity to create a RESTful API was great. It allowed me to learn more about the use of API’s and the formatting of HTTP requests.